
Location Hierarchy & Navigation
The Rules Engine page features a Location Hierarchy Tree on the side panel, allowing you to organize your Rules based on their context.
Filtering by Location: Clicking a specific location in the tree filters the Rules table. The table will update to show only the rules that apply to streams under that location.
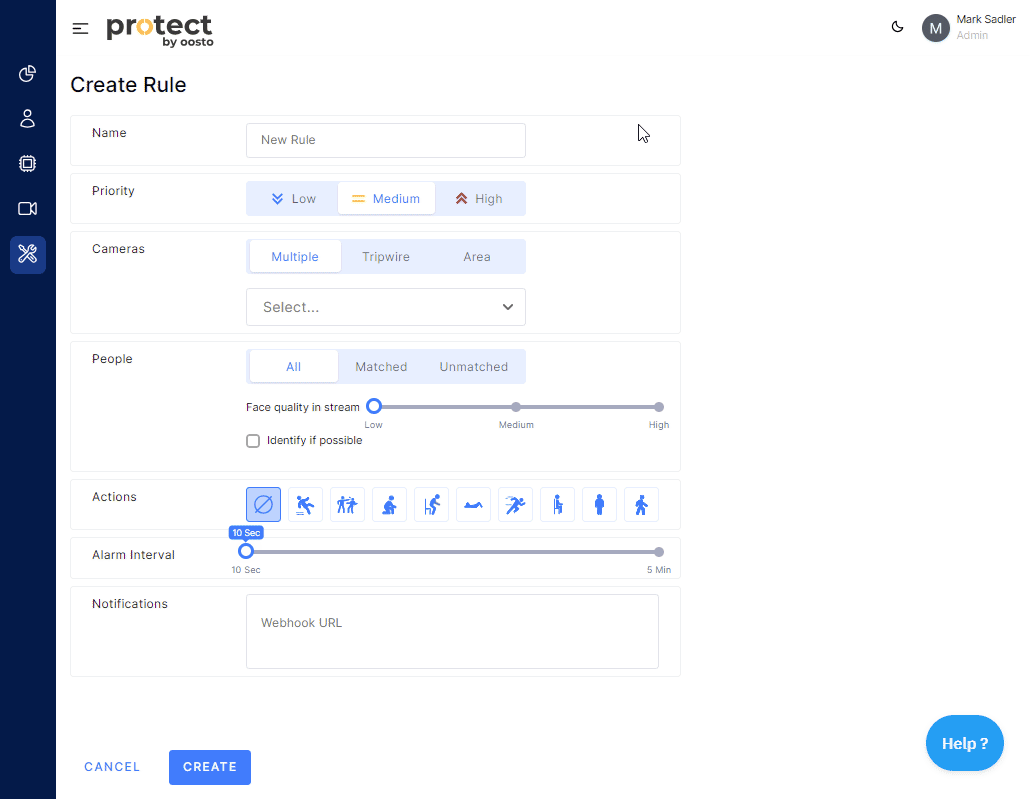
Create Rule
Protect rules engine lets you tailor the alerts you get. You can choose the input parameters you need when making rules. To make a new rule, go to “Rules Engine” on the menu and click on “Create Rule”
Rule Name
Type in a “Rule Name” - This name should indicate the cause of the “Alert” so that the end user who gets this alert will be able to comprehend why it happened.
Priority
Choose a "Priority"- This will help the end user to know the importance of this "Alert" for the business and also enable the end user to find and order by this priority.
Cameras Selection
Pick the stream that you want to apply the current rule to.
Choose “Multiple”
Choose “Tripwire”
Choose “Area”
Multiple Streams
When you choose Multiple streams, you can select any combination of individual streams and locations. Selecting a location applies the rule to all streams within it; selecting individual streams applies it to only those streams. Both selections are additive - if you select a stream and a location, the rule runs on all of them combined.
Tripwire
With "Tripwire", you can select and specify one camera, and the analytics will use the Tripwire as the area of interest for the analysis.
After choosing a camera, you will see a snapshot from the live camera FOV. You can take the snapshot again by clicking the refresh icon.

To draw the tripwire on the snapshot, click the edit icon to see a bigger snapshot where you can draw a line. Select any two points and a line will connect them.
The line will be created with both directions of flow for analytics analysis. To analyse one direction only, click the arrows on the line. Each click will change the line to show one direction, then the other, and then go back to both directions.
Click “Save”
The drawing tool can also undo the previous selection or erase the entire drawing and begin again.
When using Tripwire mode, actions are not relevant for the rule and are removed.
Area
With "Area", you can pick and set one camera, and the analytics will use this Area as the focus area for the analysis.
After picking a camera, you will see a snapshot from the live camera FOV. You can take the snapshot again by clicking the refresh icon.
To draw the area on the snapshot, click the edit icon to see a bigger snapshot where you can draw a polygon. Choose as many points as you want, a line will be drawn on each choice, to close the area choose the first point again and the area will be fully shaded blue for the focus area.
Press “Save”
After saving, you can choose to use the area of interest for the region inside or outside the area you selected.
The drawing tool can also undo the last choice or erase the whole drawing and start again.
Loitering – nable this to trigger an alert only when a subject remains inside/outside the selected area for longer than a specified duration.
People
The people section allows you to select a filter for who you want to trigger the "alert".
All People - includes any person we detect
Matched people - includes any person(s) we identify within a “person group(s)” for uploaded person images
Unmatched people - includes any person(s) we fail to identify by “person group(s)” for uploaded person images
All
When you choose "All", you can also choose to "identify if possible". This lets you match the person who activated the rule to "All Person Groups" and identify them if we recognize them. This will use a high threshold to find their identity.
Matched people
This will enable you to compare a person with one or more groups in the system. Choose the group(s) that you want to use to identify the person in the FOV.
You can then choose if this Matched person's "Authorization" such as a VIP "Authorized" or not permitted such as an elopement resident "Unauthorized" which will be displayed to the end user to help them know why we are recognizing this person. You can also turn off this indication by selecting the "None" option.
Unmatched People
This will let you compare a person with one or more groups in the system. When the Person is not in those groups the system will show that the person is "Unknown" in this FOV.
You can then decide if this Unknown person is "Unauthorized" which will be shown to the end user to help them understand why we are detecting this person. You can also disable this indication by choosing the "None" option.
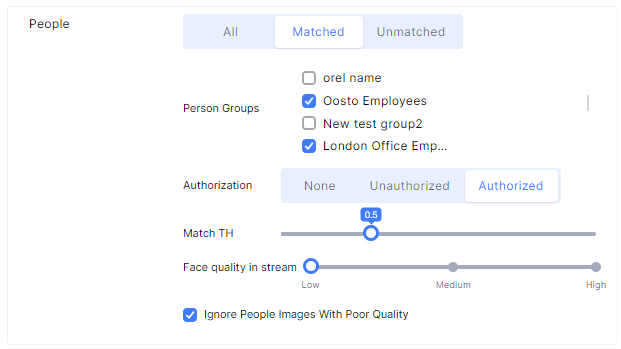
Matching Quality (Confidence)
This section allows you to adjust the default settings for matching people, which are designed to reduce false positives. The quality of the matches depends a lot on real-world conditions, such as the quality of the camera stream (artefacts, blur, distance, angle) and the quality of the images of the enrolled people.
You can change the level that triggers an “Alert” in this section.
Matching Threshold “Match TH”
This indicates how confident we are that the person is matched. Our levels correspond to the following confidence intervals.
Low – 0.3 > 0.4
Medium -0.41 > 0.5
High – 0.51 > 0.6
Very High – 0.61 > 1
Face Quality in Stream
This lets you filter out lower-quality images from the source stream that might affect the matching accuracy. This will also reduce the chances of matching a person in some cases, as it may exclude people who have more obstructions, are moving fast, or are only briefly visible.
Ignore People Images with poor quality
By default, the system discards any “Alerts” for poor-quality images of people. If you still want to match these low-quality elements, the “Matching TH” will be based on this low-quality image and should be considered when evaluating this recognition.
Action behaviors
The system lets you identify different behaviors that a person or a specific people are performing. You can activate the identification of behaviour by clicking on one of the action buttons. Which will act in addition to the rule settings above.
The available Actions now are:
Falling, Fighting, Crouching, Getting Up, Lying Down, Running, Sitting and Loitering.

You can turn off the behavior identification by choosing "none"
You can also choose a minimum duration for the behavior before it sends an “alert”, this prevents the behavior from sending an alert if it does not last for this minimum time.
Fighting Sensitivity – Adjust the sensitivity level to control how easily a fight is detected; higher sensitivity may detect minor altercations but could increase false positives.
Custom Schedule
By default, rules run continuously. The Custom Schedule feature lets you control exactly which days and hours each rule is active.
To enable scheduling, toggle the Custom Schedule to Active.
Important: The schedule feature is off by default. Existing rules are unaffected unless you explicitly enable it.
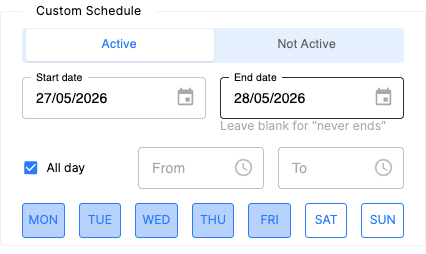
Start and End Date
Set a Start Date for when the schedule should begin. Leave the End Date blank for a rule that runs indefinitely, or set one to automatically stop the rule on a specific date.
All Day or Custom Time Range
By default, all days of the week are pre-selected for full weekly coverage. Rules also run all day by default.
To restrict the time window, uncheck All Day and define a From and To time. Times can be selected in 30-minute intervals or entered manually for precision.
Overnight rules: When a rule spans midnight (e.g., 11:00 PM – 4:00 AM), the system automatically detects the overlap and displays a plain-language confirmation - for example, "Starts Monday night and ends Tuesday morning" - so there is no ambiguity in how overnight schedules behave.
Day Selection
Toggle individual days on or off to match your operational hours. All days are selected by default.
Schedule Status in the Rules Table
Each rule in the rules table displays a schedule status indicator so you always know what is running and what is waiting.
Status | Condition | Icon | Hover Behavior |
Running Now | Rule is enabled, no schedule configured, runs continuously |
| None |
Running Now (Scheduled) | Rule is enabled and currently active within its scheduled time window |
| "Currently Running" |
Scheduled | Rule is enabled but outside its active window, or schedule has expired |
| "Next execution at [TIME]" or "No upcoming occurrences" / "Expired Rule" |
Disabled | Rule is off, regardless of schedule |
| None |


Alert Settings
Alert Interval – Use the slider to set a "cooldown" period between alerts for the same subject or Track ID.
Range: 10 seconds to 5 minutes.
Function: If the same subject (Tracker ID) triggers the rule multiple times within this window, only one alert is sent. This reduces notification noise for continuous events.
Note: The Alert Interval cooldown is scoped per edge device. Streams on the same edge device share one cooldown for the same person. Streams on different edge devices each maintain their own cooldown, so the same person seen across multiple devices may trigger multiple alerts.
Video Evidence – Use this toggle to control video recording for the rule.
Enabled: The system records and uploads a video clip of the event (Default).
Disabled: No video is recorded or uploaded ,the alert will appear in the system with a "No video evidence available" label.
Webhooks
By default, an "Alert" will show up in the Protect Dashboard (Alerts Monitoring) and Protect Mobile applications when it is activated. You can also set up a rule to activate a webhook for other external application triggers.
Copy and paste the webhook URL of the third-party receiving application in the textbox provided if you want the alerts webhook to be sent.
After that, save the Rule and it will be done.
Rule Status Indicators
Description: Rules are periodically automatically validated to identify misconfigurations, with clear indicators for issues.
Indicators:
No Stream Assigned: Rules without linked cameras are auto-disabled and display: “Rule disabled: No camera assigned.”
No Person Group Assigned: Rules using Matched or Unmatched people filters without a person group are auto-disabled and display: “Rule disabled: No person group assigned.”
Combined Missing Data: Rules missing both cameras and person groups display: “Rule disabled: Rule person group(s) and camera(s) do not exist anymore.”
Configuration:
Check the rule’s status on the Rules Engine page or during configuration.
Address any issues (e.g., assign cameras or person groups) to enable the rule.