
Overview
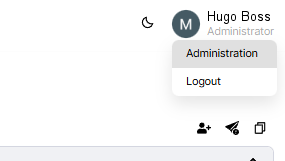
The Administration page in Protect centralizes tools for authentication, managing users, defining roles, and enhancing security. This guide covers each feature, providing step-by-step instructions and best practices for administrators. The administration capabilities can be found by clicking the users profile image on the top right of the application.
User Management
Admins can manage users directly within Protect, streamlining onboarding, access control, and account maintenance.
Features
Invite users and monitor their approval status.
Delete or disable user accounts.
Set periodic access for temporary users (e.g., contractors).
Edit user roles to align with responsibilities.
Configuration
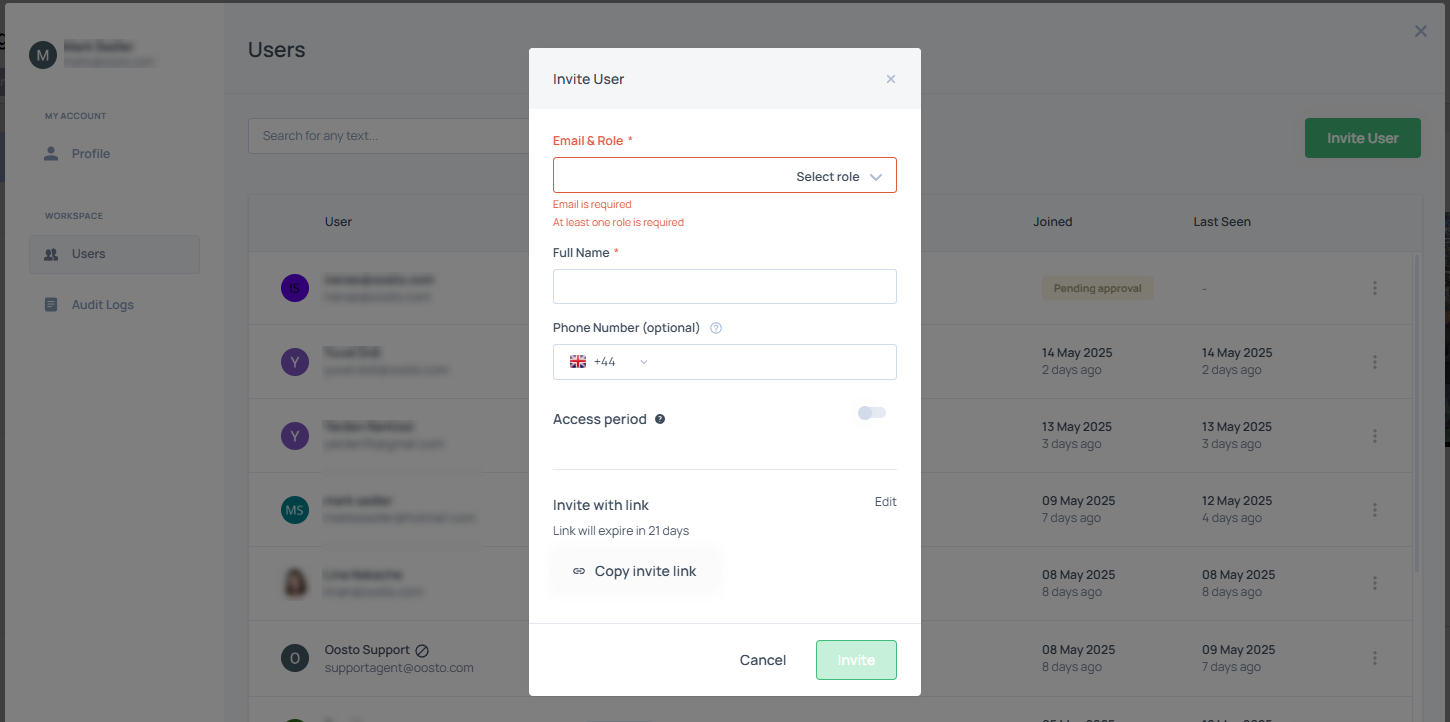
Navigate to the Administration page and locate the User Management section.
To invite users:
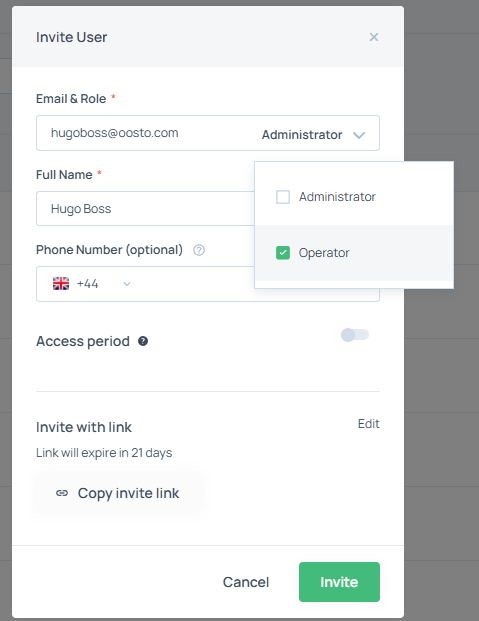
Click Invite User, enter the user’s email, and select their role (e.g., Operator or Administrator).
The user will be sent an invitation email.
Monitor the approval status in the user list.
To delete or disable accounts:
Select a user from the list and choose Delete to remove the account or Disable to suspend access.
To set periodic access:
For temporary users, specify an access expiration date during the invitation process or edit an existing user’s settings.
To edit user roles:
Select a user, update their role, and save changes.
Role-Based Access Control
Protect introduces role-based access control with a new Operator role, providing finer-grained control over permissions across both the web and mobile applications.
Roles
Alert Viewer:
Can view dashboards and manage alerts.
Operator:
Can view dashboards, manage alerts, and save faces from alerts.
Cannot modify system settings or user accounts.
Administrator:
Full access to all Protect features, including user management and system configuration.
See the full Roles details below
Category | Action Type | Alert Viewer | Operator | Administrator |
Alert Monitoring | View alerts, report false alert, share alerts and switch to live | V | V | V |
Hierarchical Tree | View Location and Streams | V | V | V |
People | View people, person groups | - | V | V |
Streams | View and refresh streams | - | V | V |
Devices | View and refresh devices | - | V | V |
Rule Engine | View rules | - | V | V |
System Settings | View/Edit Notifications filter(if not locked) | V | V | V |
Administration | User administration | - | - | V |
Configuration
Navigate to the user
To assign roles:
During user invitation or editing, select Operator or Administrator from the role dropdown.
Save changes to apply the role.
Note
We welcome suggestions for new roles or permissions. Future role enhancements are planned based on user feedback.
Expanded Authentication Support
Protect has upgraded its authentication options to offer greater flexibility and security for user access.
Features
New Methods:
Sign in with Google: Use Google account credentials.
Sign in with Microsoft: Use Microsoft account credentials (e.g., Office 365 or Azure AD).
Standard Email and Password: Use a registered email and password.
Single Sign-On (SSO):
Supports SAML service providers and OpenID Connect identity providers (e.g., Okta, Azure AD).
Contact your account manager to configure SSO for your organization.
Configuration
No Configuration is required to use these methods. When inviting users with the applicable email, this system will automatically use the highest level of authentication.
Note
SSO requires coordination with your identity provider and support.
Ensure users are informed about available login methods to streamline access.
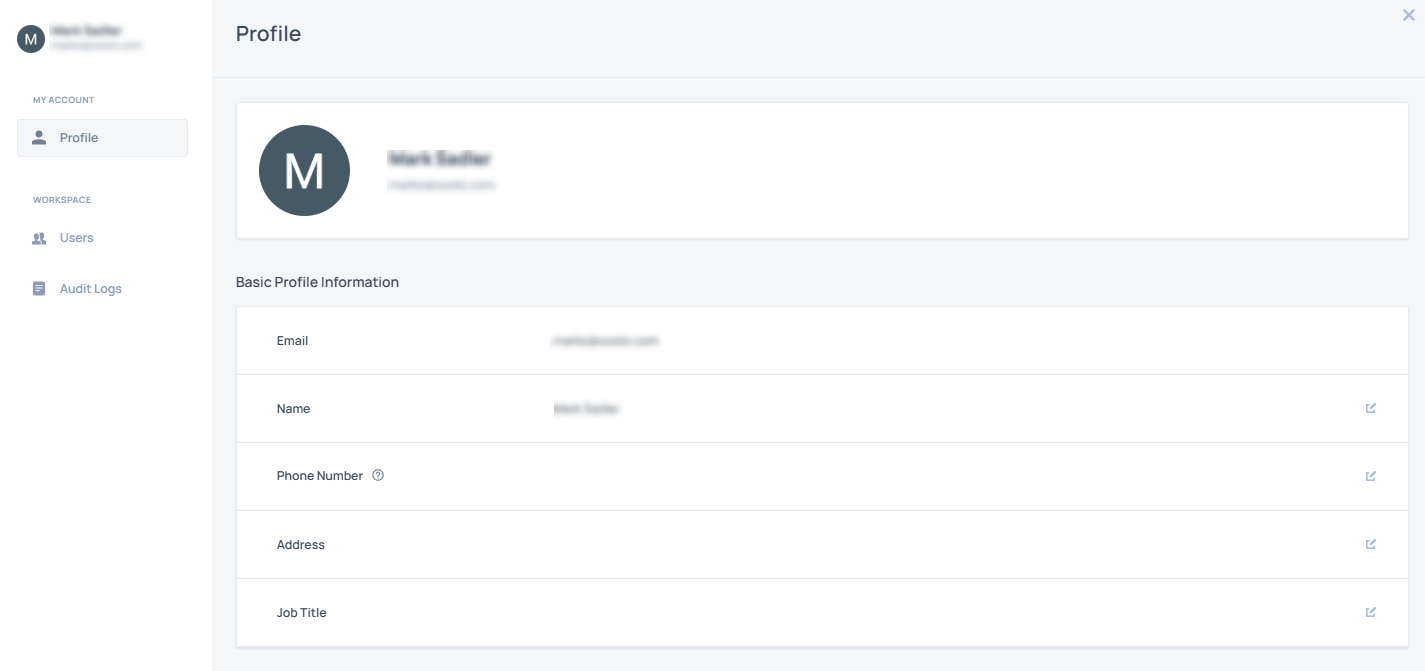
Self-Service User Profiles
Users can update their own profile details, reducing administrative overhead.
Features
Users can edit their name, contact information, and other profile details.
Configuration
Navigate to the Administration page and locate the User Profiles section.
Instruct users to:
Access their profile from the account settings menu.
Update their name, contact information, or other fields as needed.
Save changes to apply updates.
Security Enhancements
Protect offers robust security features to safeguard data and control access, including audit logs, password policies, and domain restrictions.
Features
Security Audit Log:
Tracks all user access and administrative actions, such as logins, role changes, and configuration updates.
Accessible to administrators in the Security tab.
Password Policies (for non-Google/Microsoft logins):
Complexity: This is shown to the end user when they are using a standard email/password signup
Expiration: Passwords expire every 90 days.
Domain Restrictions:
Restrict user invitations to approved email domains (e.g., yourcompany.com).
Existing users are unaffected.
Contact your account manager to enable this feature.
Configuration
Navigate to the Administration page and select the Security tab.
To view audit logs:
Access the Security Audit Log section to review logged actions.
Filter logs by date, user, or action type as needed (see System Audit Log User Guide for details).
To configure password policies or enable domain restrictions for invitations, please speak with your Protect representative, dependant on your service plan.