
The Protect mobile application is available for download from the Apple App Store for iOS devices and the Google Play Store for Android devices.
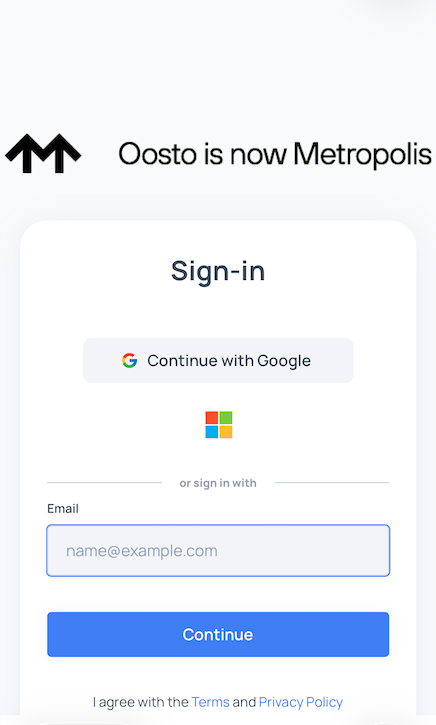
Sign In
To begin, securely sign in using your existing Protect organizational credentials. The same username and password for the web platform are used for the mobile app.
Permissions & Roles
The mobile application inherits the same robust permission and role structure as the Protect web platform. Your assigned role determines your level of access and capabilities within the app.
Alert Viewer
View alerts
Configure Notification Settings
Operator
View alerts
Manage people and person groups
View Devices and Manage Streams
Configure Notification Settings
Admin
View alerts
Manage people and person groups
Manage Devices and Manage Streams
Configure Notification Settings
Access and modify system settings
Perform bulk actions
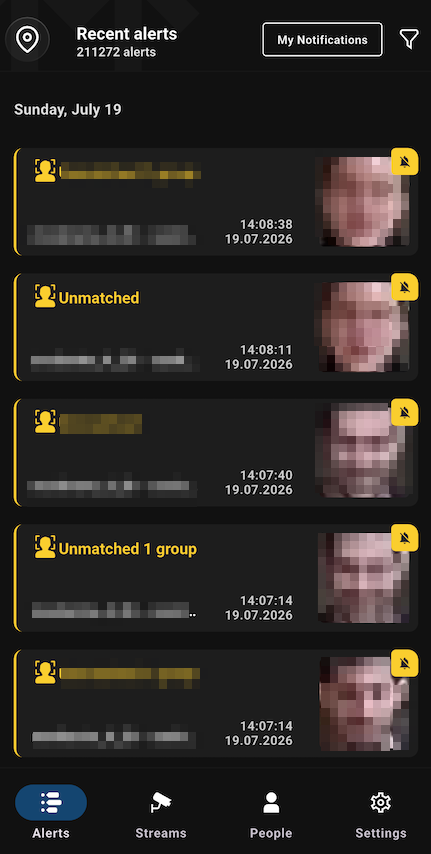
Alerts
Browse Alerts
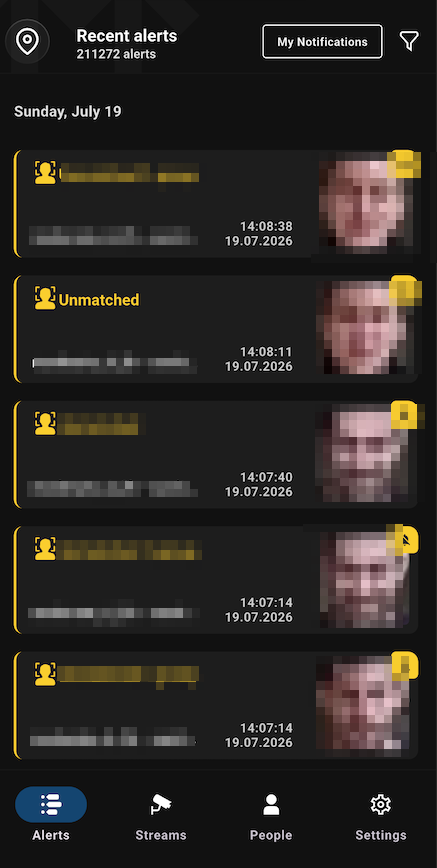
The Alerts screen is your central hub for viewing rule-based alerts as they happen.
Alerts Filters and Search
1. Location Tree (Left Panel)
The left panel contains a hierarchical tree structure used for primary navigation.
Search Functionality: Users can search the tree by Location name or Stream Name.
Hierarchical Filtering: Selecting a specific node in the tree filters the Alerts page to show only alerts associated with that location and all its descendant (sub-location) nodes.
My Notifications: You can sync your alerts view with your personal alert profile.
How it works: Toggle the My Notifications to instantly hide any alerts that don't match your specific "Custom" settings.
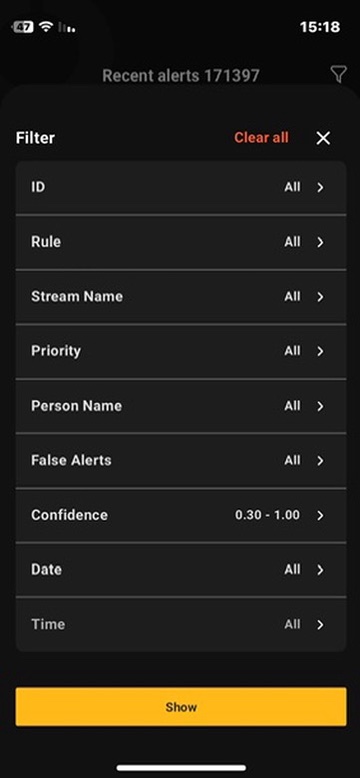
3. Attribute Filters (Right Panel)
Once a location is selected, the results can be further narrowed using the right-hand filter panel. These filters allow for granular refinement based on specific alert metadata:
View an Individual Alert
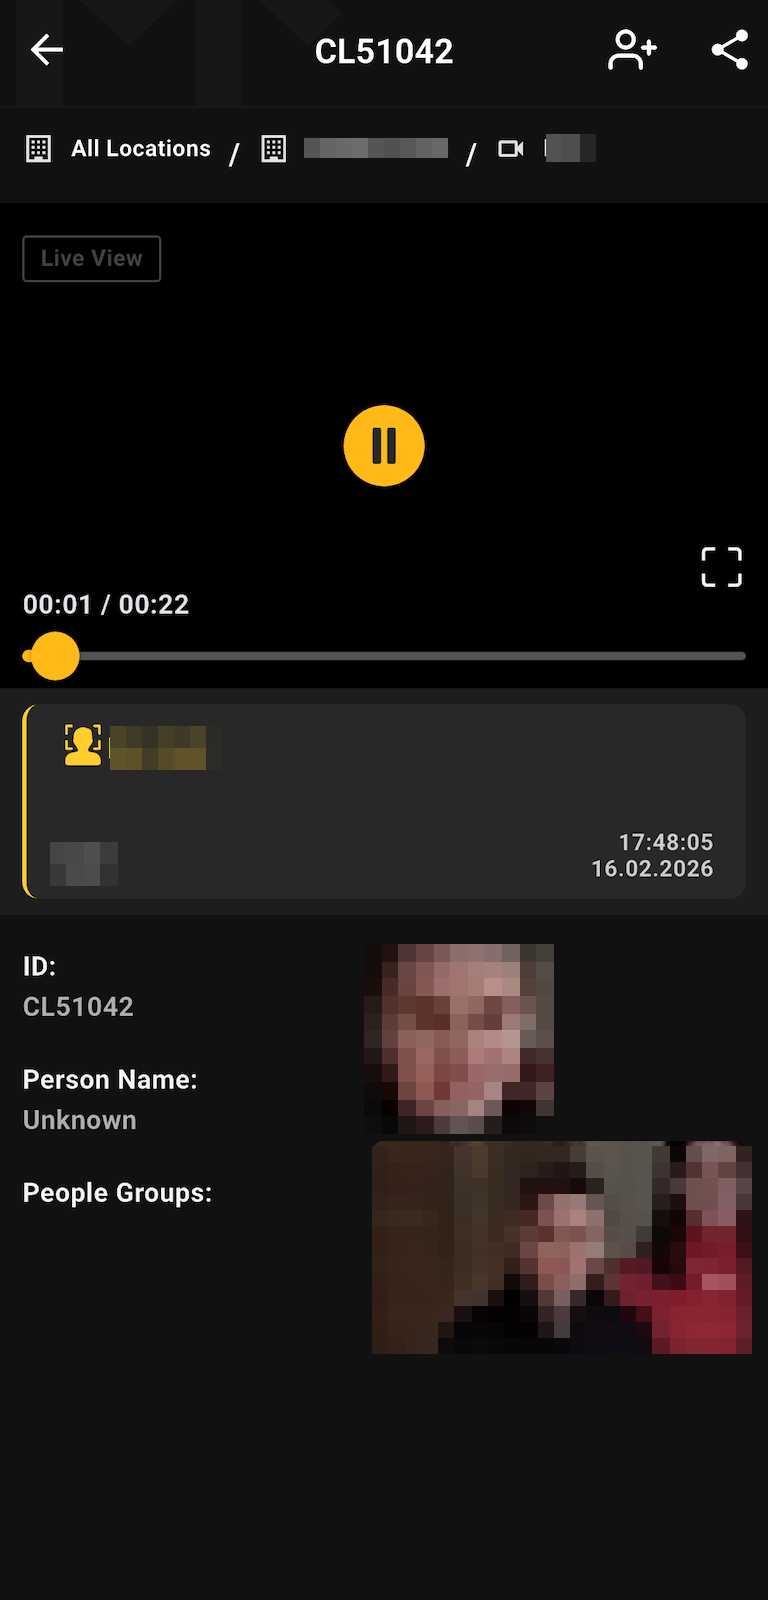
Tap on any alert in the list to open a detailed view. This screen provides complete context for the event, including:
Breadcrumbs - Displayed at the top of the detail view. These indicate the exact placement of the stream within the organizational hierarchy
Alert clip - This clip shows a period of time around the alert detection. Tap the video to access playback controls — start/stop and full screen.
Live View - The alert video player includes a "Live Preview" button that allows you to switch from the recorded alert to the live stream (if available).
Rule Name: The specific rule that triggered the alert.
Event Images: High-resolution images or frames captured during the event.
Person Group: The group the recognized person belongs to.
Timestamp: The exact date and time of the event.
Stream: The source stream that detected the event.
Managing Person Data from Alerts
If the alert involves a detected face, you can enroll or update a Person directly from this screen. Depending on whether the person was recognized or unknown, specific actions are available:
For Recognized Persons (Assign Image) If the alert identified a known person, you can improve their future recognition accuracy by adding this specific alert image to their profile.
Tap the Assign Image icon.
The "Edit Subject" screen will open with the alert crop automatically added as a new reference image.
Save the changes.
For Unknown Persons (Add Person) If the alert detected a face but marked it as "Unknown," you can create a new identity or link it to an existing one.
Tap the Add Person icon.
Smart Matching: The system will check your Watchlist for similar faces.
If matches are found: You will be offered up to 3 existing profiles to choose from. Selecting one will assign the image to that person.
If no match is found: A "Create Person" screen will open. The name will default to "[Alert ID] - Unknown" (which you can rename), and the alert image will be pre-filled.
Note: These actions are available only for Face-type alerts. They are disabled for Body alerts or older alerts that do not contain facial data. A person profile can hold a maximum of 10 images.
Alert Notifications
The "Refresh" Pop-up (iOS & Android)
When a new alert arrives that matches the user's notification preferences but is not yet visible on screen, an in-app pop-up prompts the user to refresh.
Message: "Refresh to get latest alerts."
Filter logic: The pop-up only appears if the incoming alert matches the user's Mobile App Notification Settings.
Settings dependency: Works regardless of whether Mobile System Notifications are ON or OFF - it relies entirely on the Notifications filters.
The Bell Icon (iOS Only)
Because iPhones cannot always maintain a full history of alerts received while the app is offline or notifications are disabled, a Bell Icon is used to surface missed alerts when the user returns to the app.
Trigger: An alert arrives while the user's Protect App Notifications are turned OFF.
Behavior: A Bell Icon appears next to every alert in the list that did not trigger a system notification
Persistence: The Bell Icon is permanent and is never removed - even after the user opens the alert.
Note: Users may receive new alerts that fall outside their mobile notification filter. Those alerts will still appear in the list when they open the app, but will be marked with a Bell Icon to indicate they were not pushed as a notification.
Streams & Devices
Open Streams from the bottom navigation (Alerts · Streams · People · Settings). The page has two tabs — Streams and Devices — and works the same as the web platform. Use the location (hierarchy) and filter icons at the top of either tab to narrow the list.
Streams
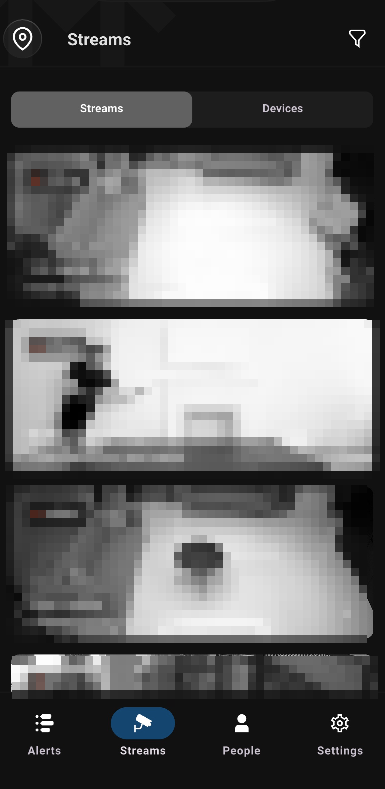
Each stream appears as a card showing a live preview, name, location label, and connection status. Tap a stream to open its live preview and full details — URL, device, resolution, max frame rate, min. face/head/body/skeleton size, and dates.
Devices
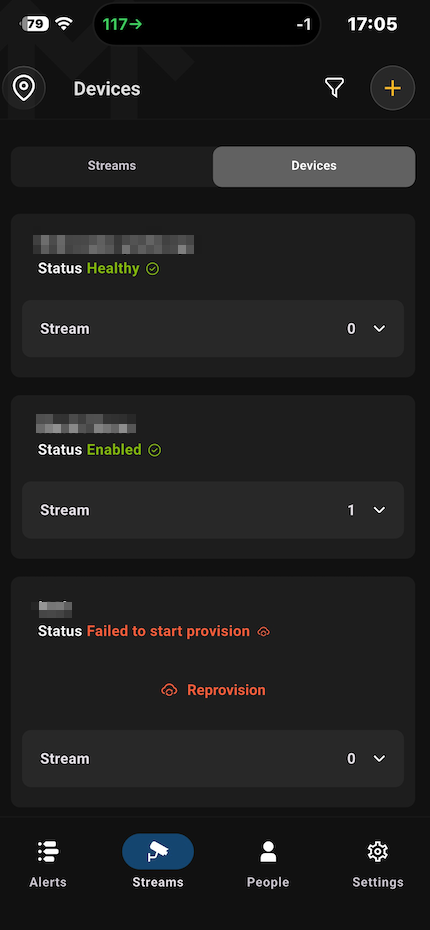
Jetson devices analyze the active streams and generate alerts. Each device card shows its Name, Status, and Stream count (tap to expand its streams). Statuses include Healthy, Enabled, and provisioning errors such as Failed to start provision — which offers a Reprovision action to retry.
Add a Device
Your Protect device arrives pre-registered with the Protect Cloud but must be provisioned to your account before use.
On the Devices tab, tap + Add Device.
Add Device Name — enter a unique name (max 150 characters).
Provide Hardware ID — enter the first MAC ID from the sticker on the bottom of the Jetson device.
Review the Summary and tap Provision.
Provisioning links the hardware to your account, validates its health, and installs software updates — this can take from 30 minutes to a few hours. For the full provisioning process, pre-flight checks, error handling, and device states, see the Quick Start Device Setup doc
Add Stream(s)
Streams are the camera feeds a device analyzes. To add cameras to a device, tap Add Streams to open the Streams Enrollment wizard, then choose an enrollment method:
Discover — scans your network to detect IP cameras (ONVIF) and add them in bulk. After discovery, enter the camera username and password to retrieve the stream URL; ready cameras show a green connection status.
Manually — add cameras one by one by entering the stream name and RTSP/RTMP URL, then check the connection.
Once added, streams appear on the Streams tab, where you can monitor connection health, open a live preview, and use them in rules to trigger alerts. For the full enrollment flow and troubleshooting, see the Streams doc.
People & Person Groups
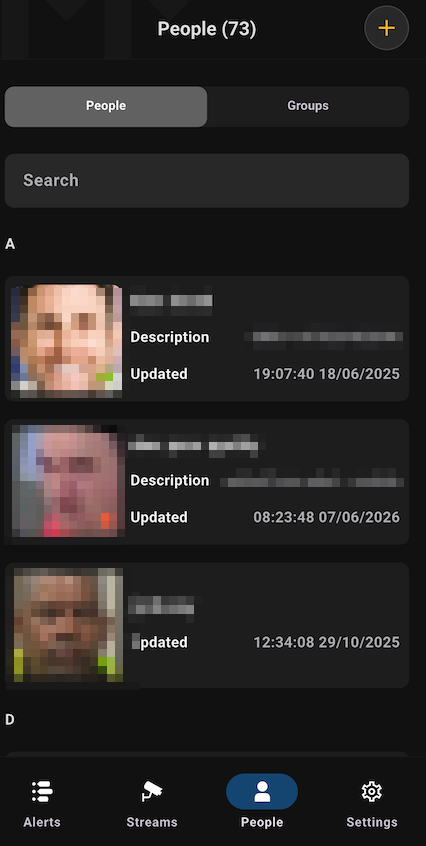
People Tab
This is the default view, presenting a comprehensive list of all individuals in the system. Each person's entry provides an at-a-glance summary:
Name: The full name of the individual.
Profile Image: The primary reference image for the person.
Quality Indicator: A color-coded icon (green/red) indicating the quality of the reference image for recognition purposes.
Last Updated: The timestamp of the most recent modification.
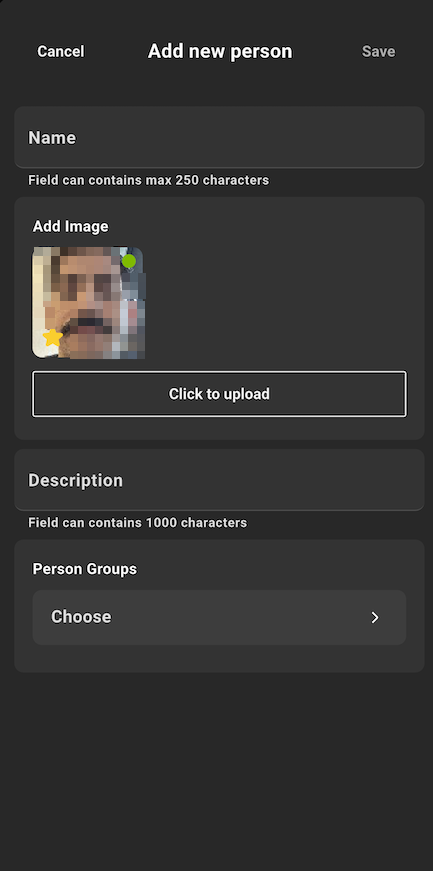
Add or Edit a Person
To add a new person, tap the + icon in the People tab. When adding or editing, you can configure the following fields:
Name: The person's full name.
Reference Image: Choose a primary image that will be used as the main reference image.
Description: Add any relevant notes or identifiers.
Person Group(s): Assign the person to one or more existing groups.
Image Upload: Add up to 10 images for a person.
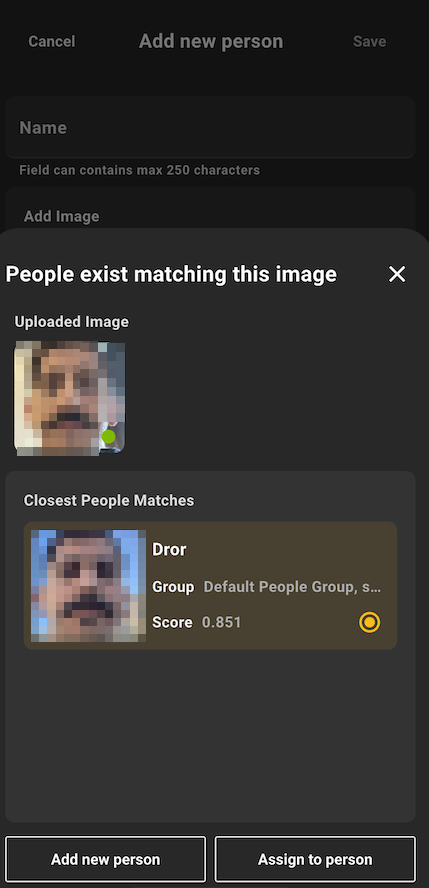
Duplicate Check:
To maintain data integrity, the system automatically checks if a similar-looking person already exists. If a potential match is found, you are presented with two options:
Add Image to Existing Person: If the person is the same, you can add the new image(s) to their existing profile.
Create New Person: If this is a different individual, you can proceed to create a new, separate profile.
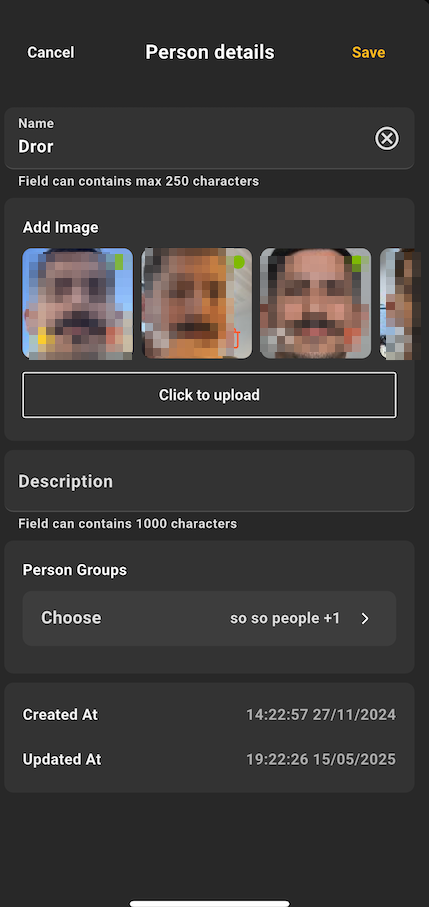
Person Profile View
Tapping on any person in the list opens their detailed profile, which includes:
All associated images, with the primary reference image highlighted.
Full Name and Description.
A list of all assigned person groups.
Person Groups Tab
Navigate to the Groups tab to view and manage all defined person groups. Each group in the list displays:
Group Name
Total People: The total count of individuals within the group.
Description
Last Updated: The date the group was last modified.
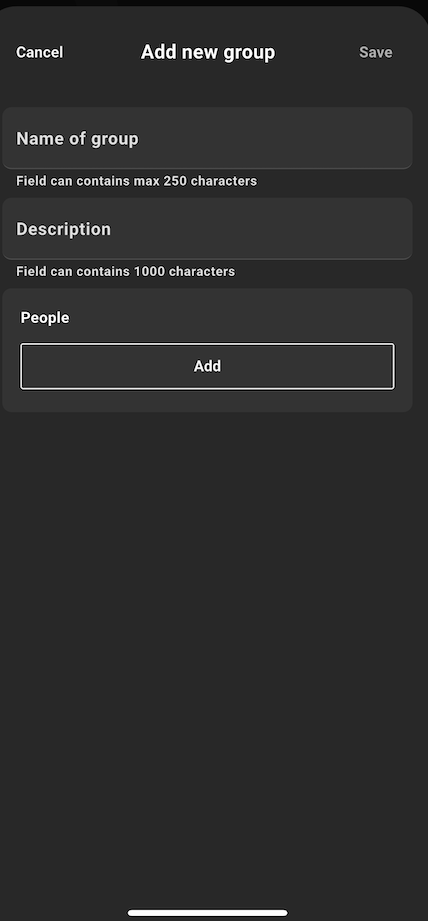
Add / Edit Person Group
To create a new group, tap the + icon on the Groups tab. The following fields are available:
Group Name: A unique name for the group.
Description: An optional description of the group's purpose.
Add People: Select and add individuals from the existing list of people to populate the group.
Notificiations Filter
The Notifications Filter gives you command over which alerts reach you. By default you receive all alerts, but you can narrow them to only what matters to your role. On mobile, these settings control your mobile (push) notifications.
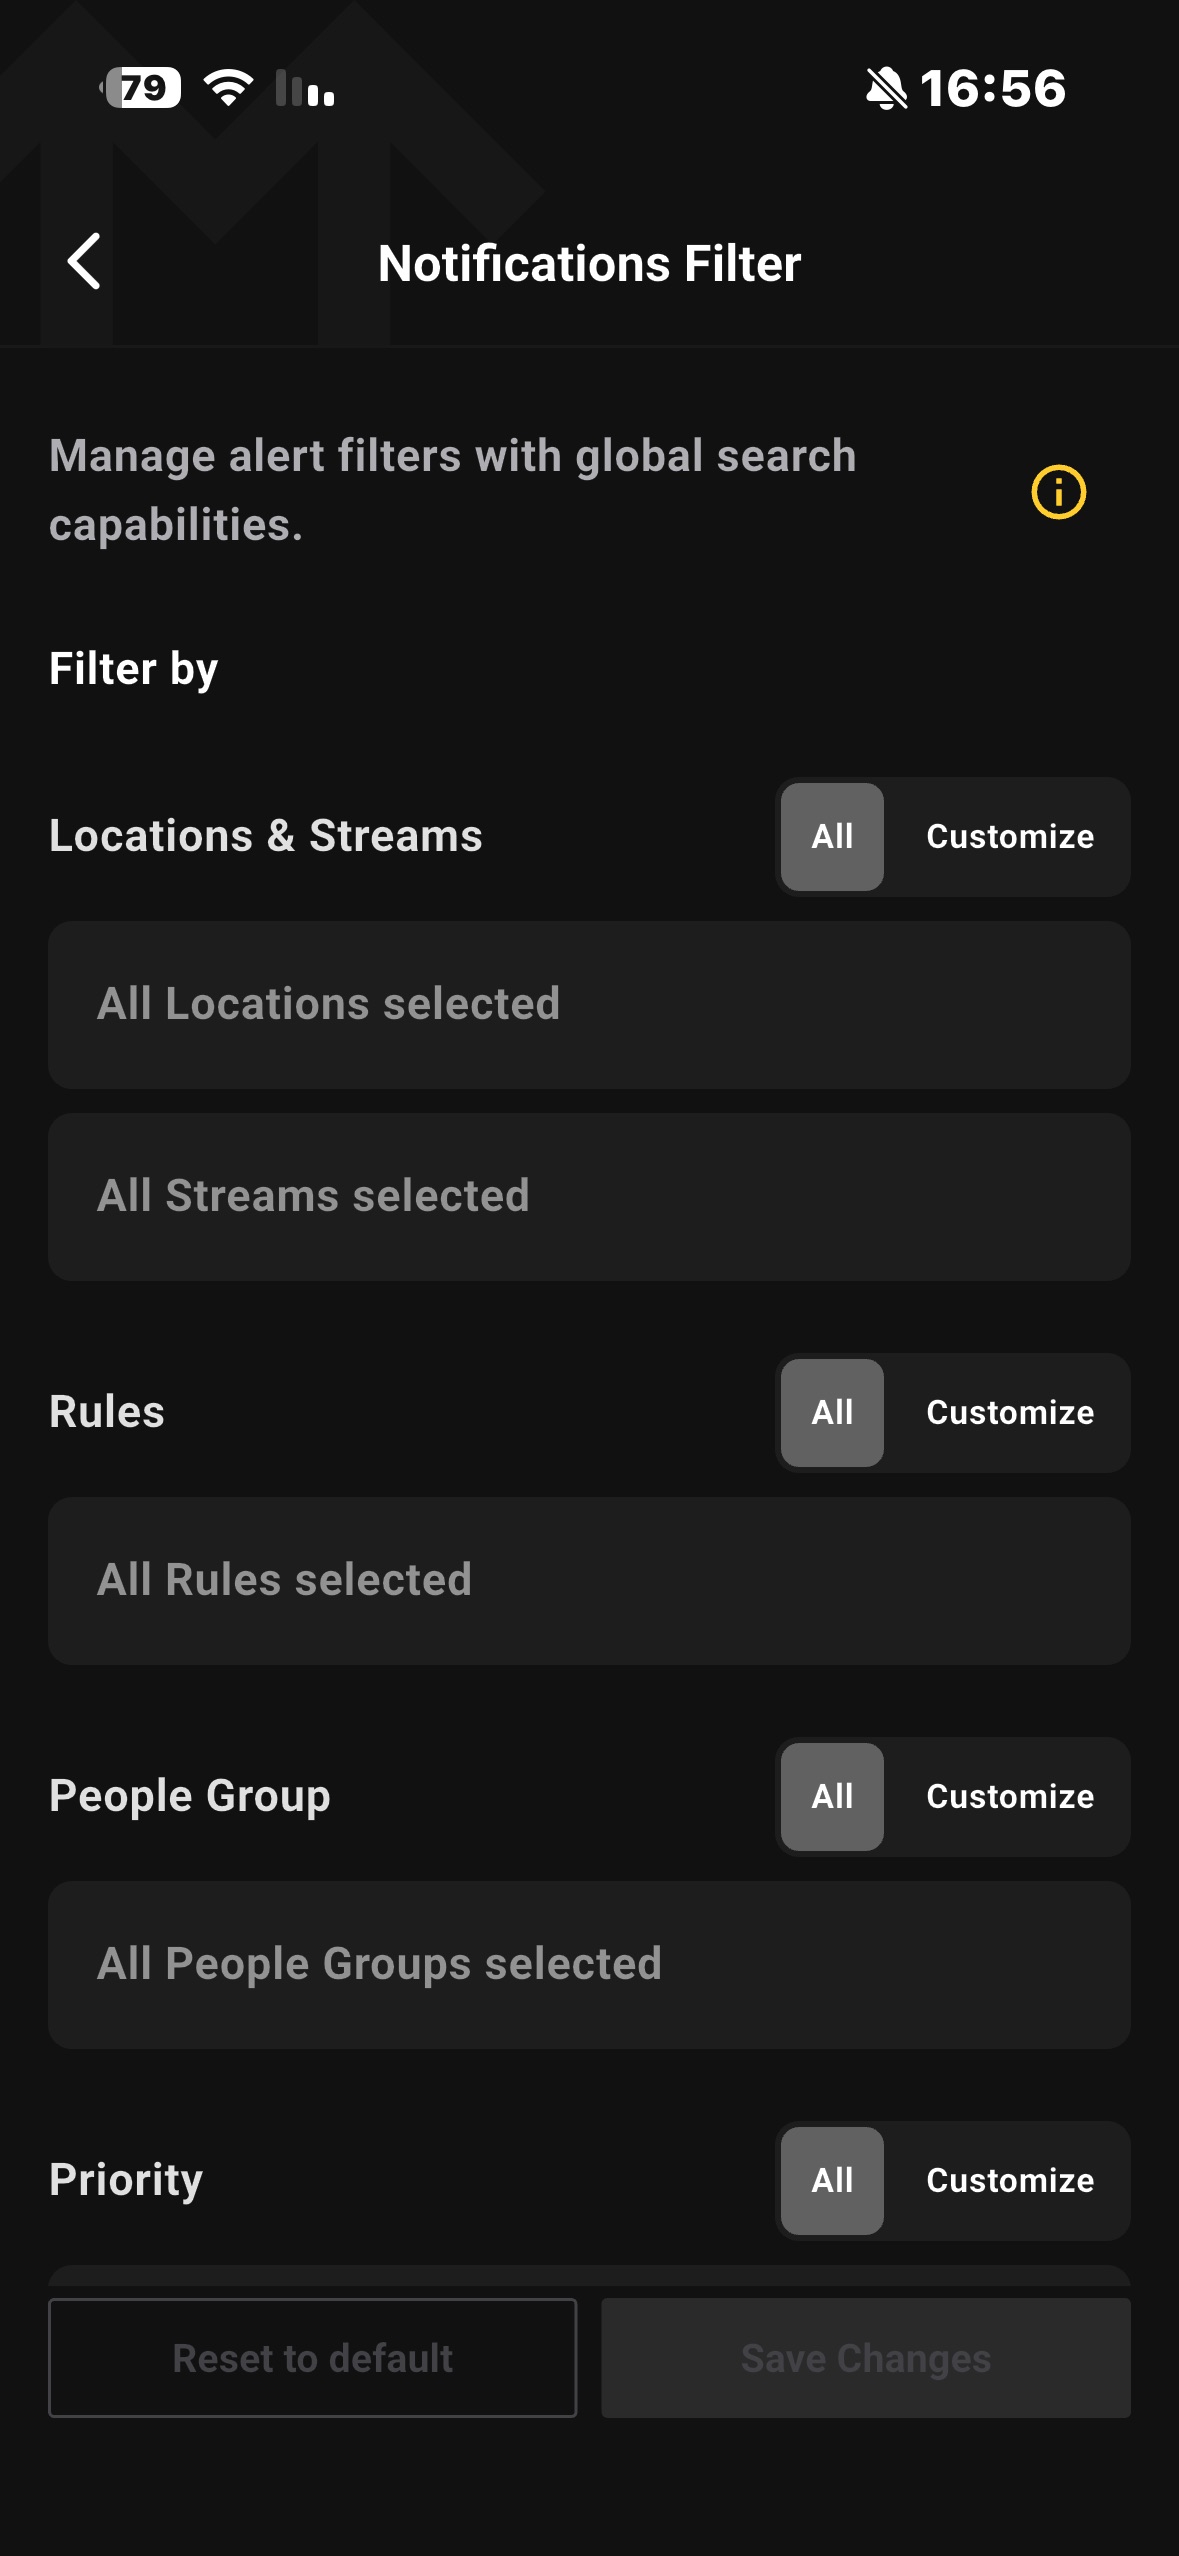
Filter Categories
You can filter across four dimensions. Each has an All / Customize toggle:
Locations & Streams: Specific sites (e.g., "Headquarters") or individual cameras.
Rules: Specific triggers (e.g., "Thief Detected").
People Group: Recognized groups (e.g., "VIPs", "Employees").
Priority: Severity — High, Medium, or Low.
All vs. Customize
All (default): You receive alerts for everything in that category. If a new camera, rule, or group is added to the system later, you automatically receive its alerts.
Customize: You receive alerts only for the items you select — with one important difference by category:
Locations: Selecting a Location also automatically includes any new cameras added to it in the future.
Rules, People Groups and individual Streams: You receive alerts only for the specific items you check. New rules, groups, or streams added later are not included until you add them manually.
Tap Save Changes to apply your filters or Reset to Default to return to receiving all alerts.
Notification & Alerts Settings
Control how and when the app notifies you. These preferences apply across the mobile experience — governing in-app banners, sounds, and vibration — and can be adjusted at any time from the Notification & Alerts Settings screen.
By default, All Notifications and In-App Alerts are on, Critical Alerts are off, and the sound profile is set to Sound & Vibrate.
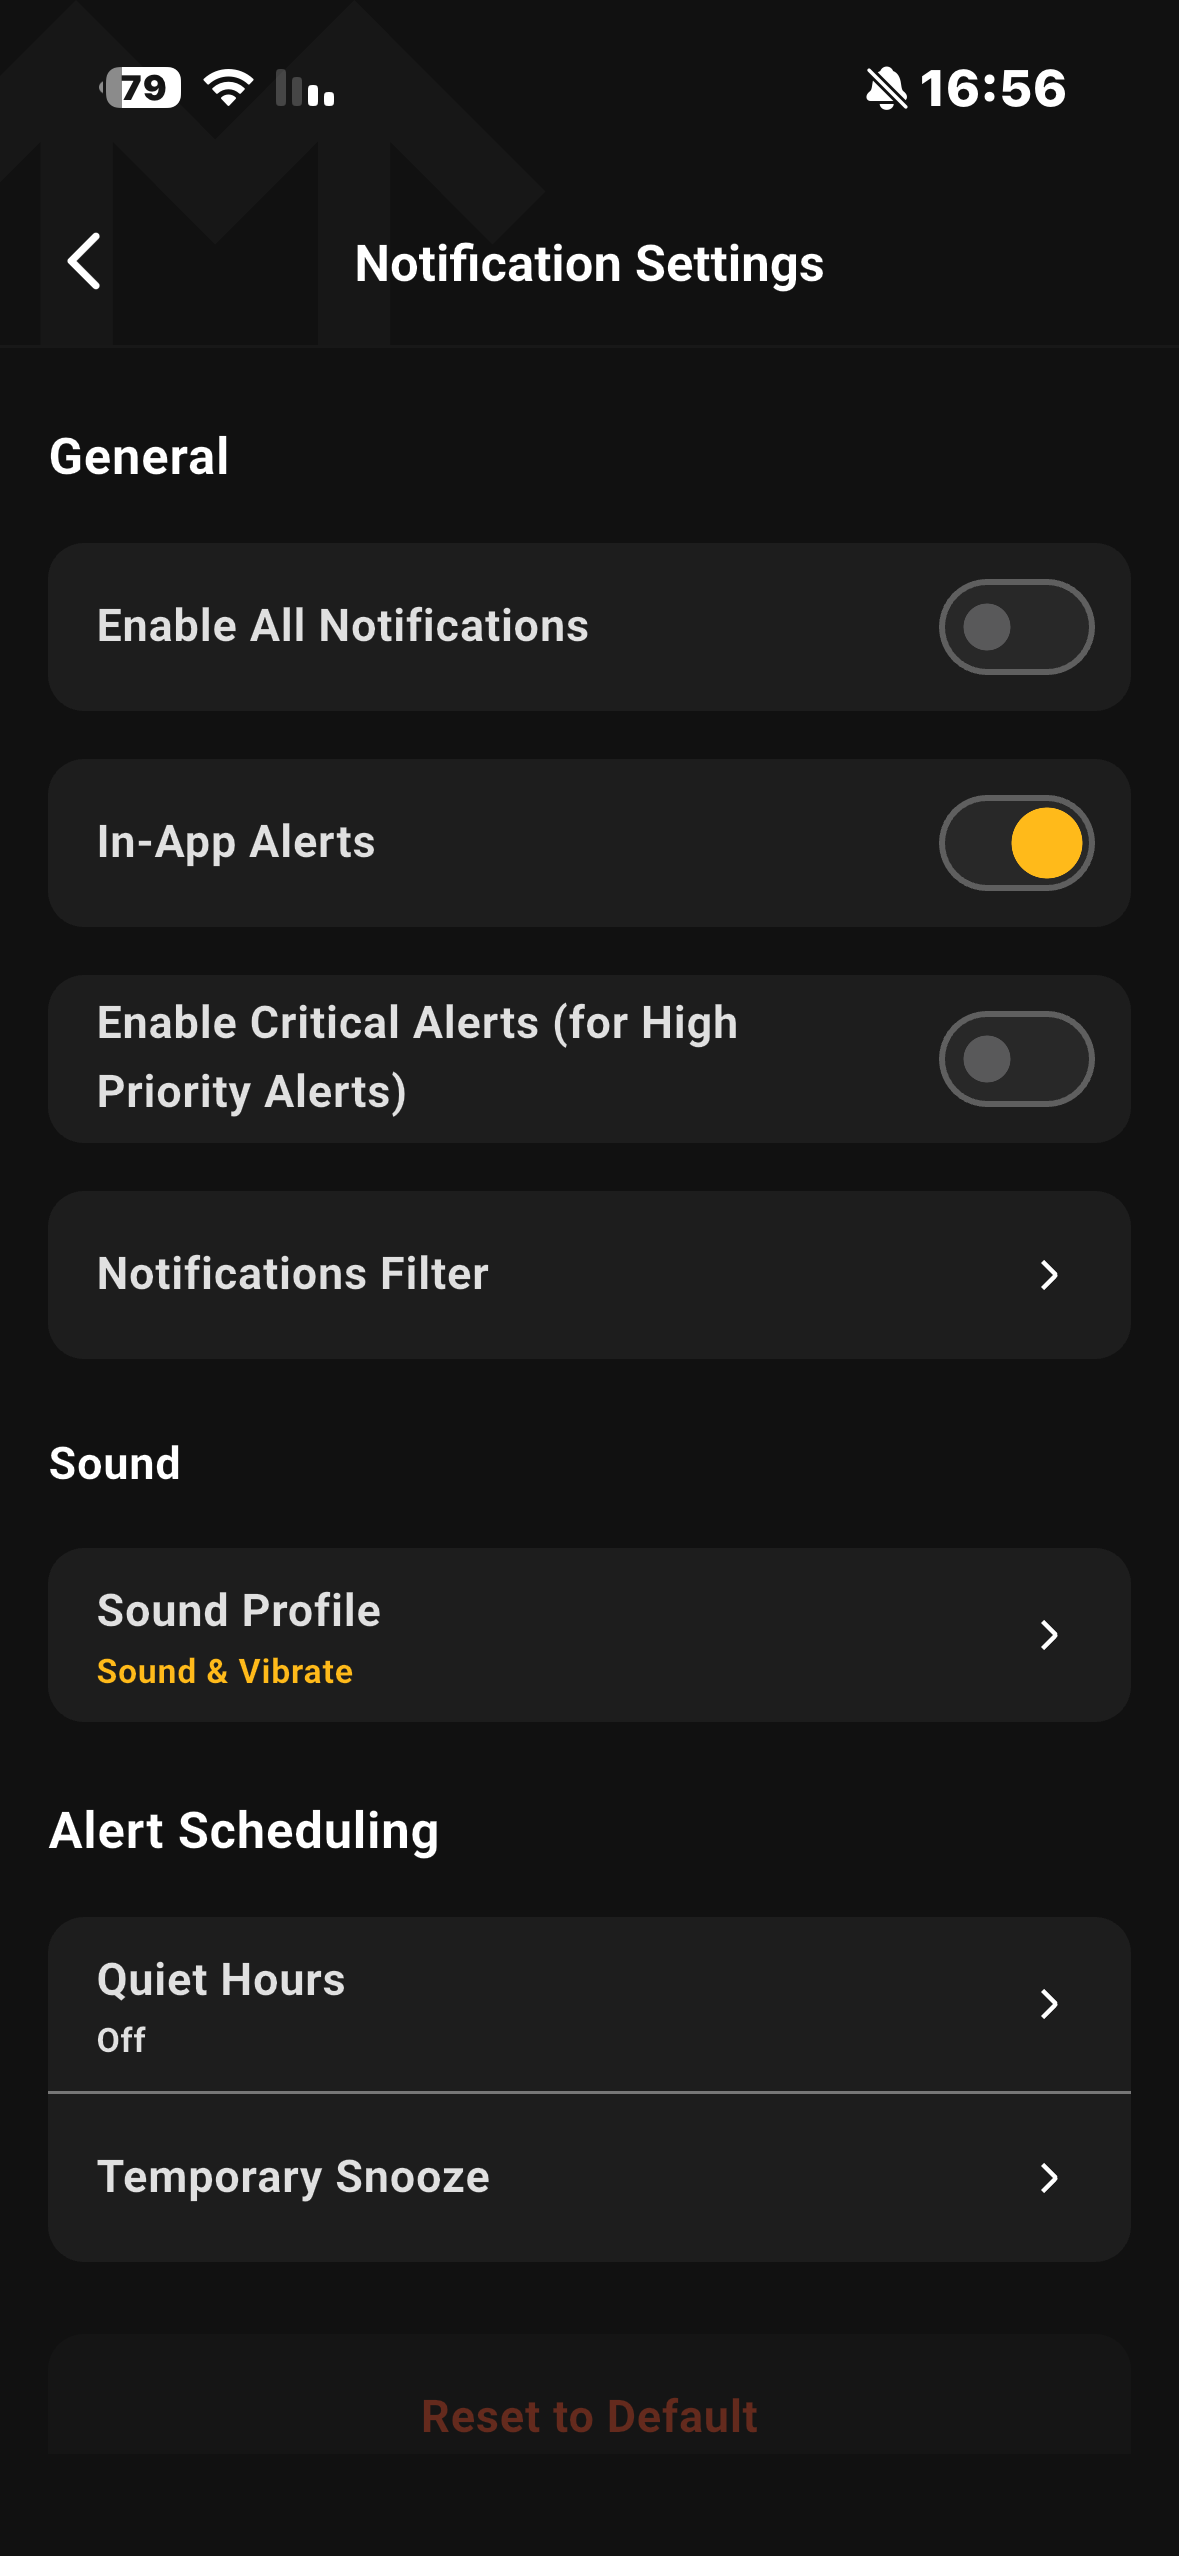
General
The top group controls the master notification behavior:
Enable All Notifications: The master switch for all app notifications.
In-App Alerts: Controls in-app banners for incoming alerts.
Enable Critical Alerts: Allows high-priority alerts to break through Do Not Disturb and silent mode, so urgent events are delivered even when your device is muted.
On iOS, if prompted, tap Allow to grant the system permission — this is required for Critical Alerts to function.
Sound Profile
Tap Sound Profile to choose how alerts are announced. The current selection is shown as a subtitle on the main screen.
Sound & Vibrate
Sound Only
Vibrate Only
Silent
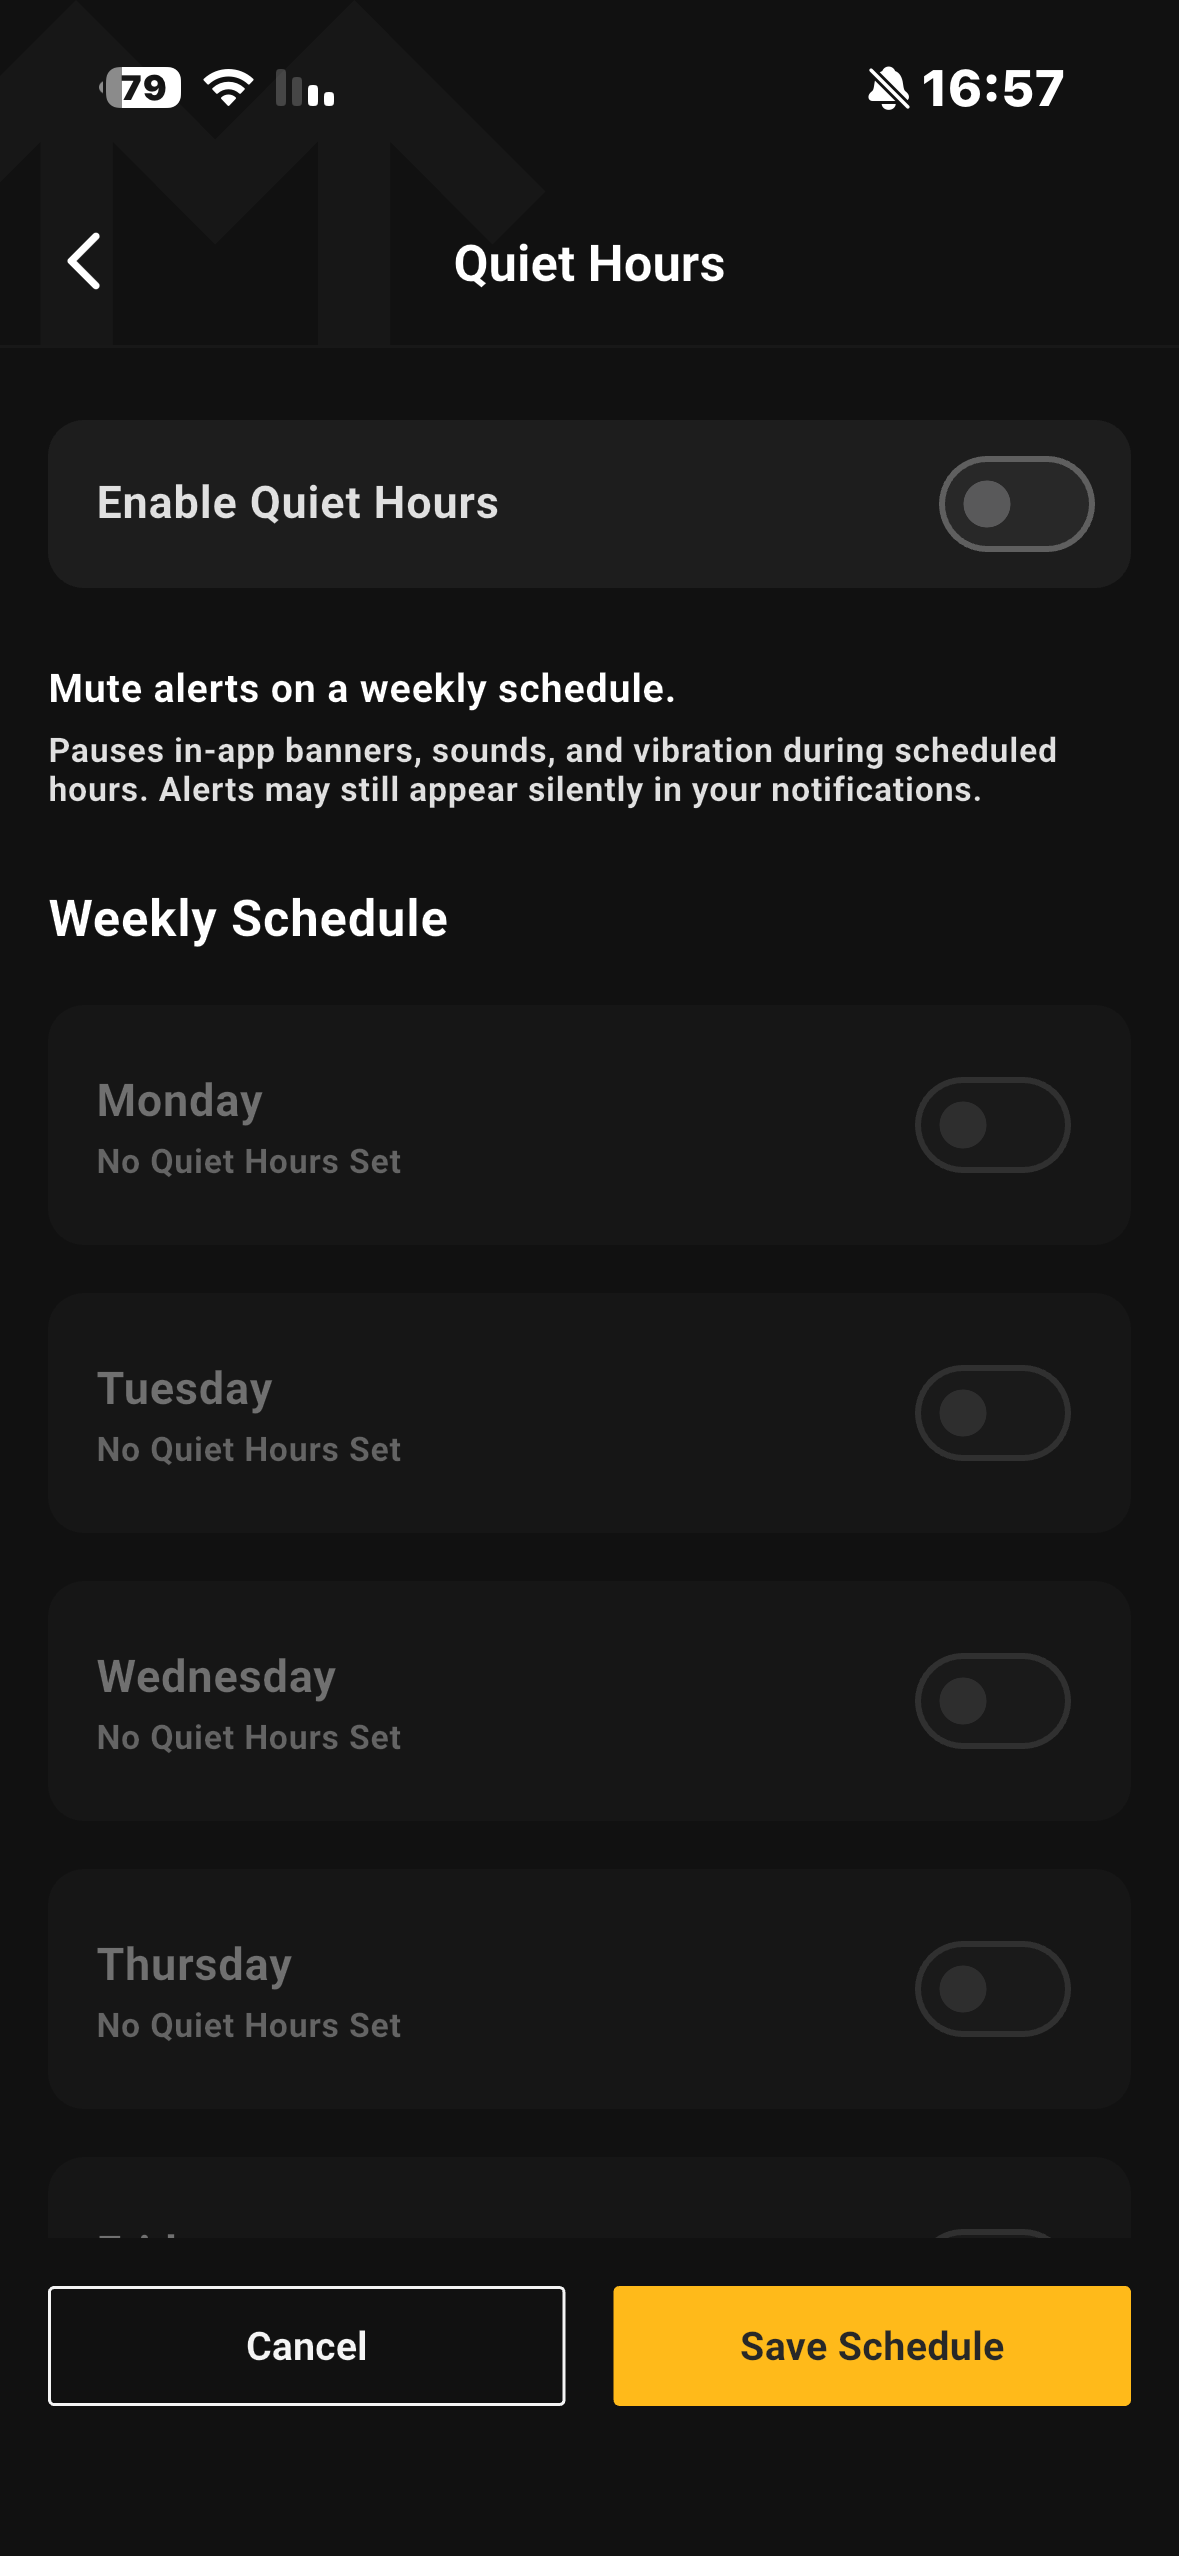
Quiet Hours
Quiet Hours let you mute alerts on a recurring weekly schedule — for example, silencing alerts every night or on weekends.
Enable Quiet Hours: The master toggle for the schedule. While off, the weekly schedule is inactive and greyed out.
Per-day configuration: Enable any day, then choose one of two modes:
All Day — the day is silenced from start to finish.
Set Hours — define a From and Until time range for that day.
Validation: The start time must be earlier than the end time. If not, the field is flagged and Save Schedule is disabled until it is corrected.
Once saved, the main screen shows a summary of the active schedule.
Snooze Notifications
Snooze provides a one-time, temporary mute — distinct from the recurring Quiet Hours schedule. Choose a duration and tap Start Snooze:
30 Minutes
1 Hour
4 Hours
Until Tomorrow · 8:00 AM
While a snooze is active, an Active badge appears on the main screen and Clear Snooze becomes available to end it early. Snooze takes precedence over Quiet Hours — when both apply, Quiet Hours is shown as "Overridden while snooze is active."

Reset to Default
Restores the default configuration (All Notifications on, In-App Alerts on, Critical Alerts off, Sound & Vibrate). This option is disabled when your settings already match the default.
Note: Quiet Hours and Snooze pause in-app banners, sounds, and vibration. Alerts are never dropped — they may still appear silently in your alerts list.
System Settings (Admin Only)
From here, administrators can:
Configure Retention Policies: Define how long alerts are stored in the system.
Manage Support Access: Enable or disable remote access for the Support team for troubleshooting purposes.
Adjust Audit Log Verbosity: Control the level of detail captured in the system's audit logs.
Manage Data Sharing: Configure preferences for sharing anonymized data for product improvement.